JavaScript / 다음(카카오) 우편번호 검색 서비스 사용하는 방법
다음(카카오)에서 우편번호 검색 서비스를 무료로 제공한다. 팝업 창에 Powerd by kakao가 표시되고, 기본 모양이 투박하다는 단점이 있지만, 빠르게 주소 검색 서비스를 구현해주는 고마운 서비스임에는 틀림이 없다.
자세한 사용법은 아래 링크에 있다.
https://postcode.map.daum.net/guide
너무 상세한 설명이라 이해가 어렵다면, 최소한의 코드로 만들고, 필요한 것을 하나씩 추가하는 게 좋다.
기본 예제와 작동 방식
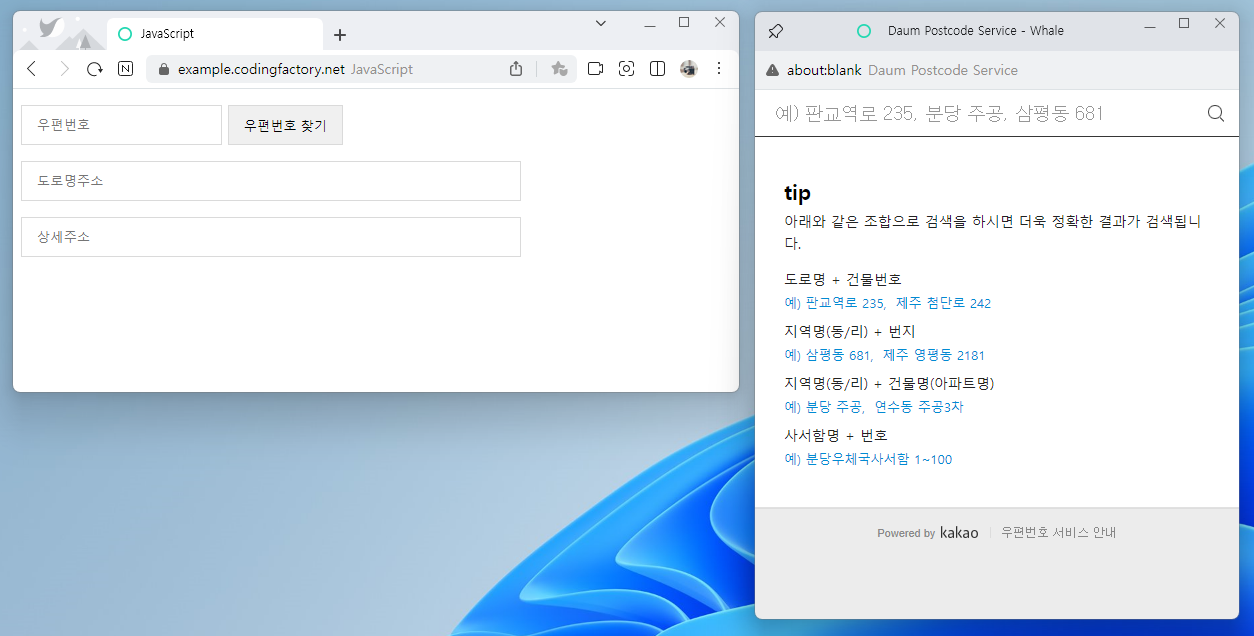
아래는 최소한의 코드로 작성한 것이다. [우편번호 찾기]를 클릭하면 팝업이 뜨고, 검색 후 주소를 클릭하면 우편번호와 주소가 입력된다.
<!doctype html>
<html lang="ko">
  <head>
    <meta charset="utf-8">
    <title>JavaScript</title>
    <style>
      * {
        box-sizing: border-box;
      }
      input {
        height: 40px;
        vertical-align: middle;
        border: 1px solid #dadada;
        padding: 0px 15px;
      }
    </style>
  </head>
  <body>
    <p>
      <input type="text" id="zip-code" placeholder="우편번호">
      <input type="button" onclick="execDaumPostcode()" value="우편번호 찾기">
    <p>
    </p>
      <input type="text" id="address-1" placeholder="도로명주소" style="width: 500px">
    <p>
    </p>
      <input type="text" id="address-2" placeholder="상세주소" style="width: 500px">
    </p>
    <script src="//t1.daumcdn.net/mapjsapi/bundle/postcode/prod/postcode.v2.js"></script>
    <script>
      function execDaumPostcode() {
        new daum.Postcode( {
          oncomplete: function( data ) {
            document.getElementById( 'zip-code' ).value = data.zonecode;
            document.getElementById( 'address-1' ).value = data.address;
          }
        } ).open();
      }
    </script>
  </body>
</html>
작동 순서는 다음과 같다.
- 우편번호 찾기를 클릭하면 execDaumPostcode() 함수를 호출한다.
- 팝업이 뜬다.
- 주소를 검색하고 결과 목록에서 주소를 클릭하면, 주소 정보를 양식에 전송한다.
가져올 정보와 어떤 양식에 값을 넣을지는 아래와 같은 코드로 정한다. 우편번호(data.zonecode)를 ID가 zip-code인 양식에 넣으라는 뜻이다.
document.getElementById( 'zip-code' ).value = data.zonecode;
가져올 수 있는 정보 목록은 아래 링크에 있다.
https://postcode.map.daum.net/guide#attributes
상세 주소에 포커스 맞추고, 전송 받은 정보는 읽기 전용으로 만들기
주소 검색 후 상세 주소에 바로 입력할 수 있게 하려면 아래와 같은 코드를 추가한다.
document.getElementById( 'address-2' ).focus();
가져온 값을 변경하지 못하게 하려면 input에 readonly를 추가한다.
<input ... readonly>
아래는 지번 주소를 추가하고, 가져온 정보는 읽기 전용으로 만들고, 상세 주소에 포커스를 맞춘 것이다.
<!doctype html>
<html lang="ko">
  <head>
    <meta charset="utf-8">
    <title>JavaScript</title>
    <style>
      * {
        box-sizing: border-box;
      }
      input {
        height: 40px;
        vertical-align: middle;
        border: 1px solid #dadada;
        padding: 0px 15px;
      }
    </style>
  </head>
  <body>
    <p>
      <input type="text" id="zip-code" placeholder="우편번호" readonly>
      <input type="button" onclick="execDaumPostcode()" value="우편번호 찾기">
    <p>
    </p>
      <input type="text" id="address-1" placeholder="도로명주소" style="width: 500px" readonly>
    <p>
    </p>
    <input type="text" id="address-1-1" placeholder="지번주소" style="width: 500px" readonly>
  <p>
    </p>
      <input type="text" id="address-2" placeholder="상세주소" style="width: 500px">
    </p>
    <script src="//t1.daumcdn.net/mapjsapi/bundle/postcode/prod/postcode.v2.js"></script>
    <script>
      function execDaumPostcode() {
        new daum.Postcode( {
          oncomplete: function( data ) {
            document.getElementById( 'zip-code' ).value = data.zonecode;
            document.getElementById( 'address-1' ).value = data.address;
            document.getElementById( 'address-1-1' ).value = data.jibunAddress;
            document.getElementById( 'address-2' ).focus();
          }
        } ).open();
      }
    </script>
  </body>
</html>
초기화 버튼 만들기
input에 readonly를 추가한 경우 값을 지울 수 없다. 초기화 기능을 넣고 싶다면 다음과 같이 한다.
<!doctype html>
<html lang="ko">
  <head>
    <meta charset="utf-8">
    <title>JavaScript</title>
    <style>
      * {
        box-sizing: border-box;
      }
      input {
        height: 40px;
        vertical-align: middle;
        border: 1px solid #dadada;
        padding: 0px 15px;
      }
    </style>
  </head>
  <body>
    <p>
      <input type="text" id="zip-code" placeholder="우편번호" readonly>
      <input type="button" onclick="execDaumPostcode()" value="우편번호 찾기">
      <input type="button" onclick="execDaumPostcodeReset()" value="초기화">
    <p>
    </p>
      <input type="text" id="address-1" placeholder="도로명주소" style="width: 500px" readonly>
    <p>
    </p>
    <input type="text" id="address-1-1" placeholder="지번주소" style="width: 500px" readonly>
  <p>
    </p>
      <input type="text" id="address-2" placeholder="상세주소" style="width: 500px">
    </p>
    <script src="//t1.daumcdn.net/mapjsapi/bundle/postcode/prod/postcode.v2.js"></script>
    <script>
      function execDaumPostcode() {
        new daum.Postcode( {
          oncomplete: function( data ) {
            document.getElementById( 'zip-code' ).value = data.zonecode;
            document.getElementById( 'address-1' ).value = data.address;
            document.getElementById( 'address-1-1' ).value = data.jibunAddress;
            document.getElementById( 'address-2' ).focus();
          }
        } ).open();
      }
      function execDaumPostcodeReset() {
        document.getElementById( 'zip-code' ).value = null;
        document.getElementById( 'address-1' ).value = null;
        document.getElementById( 'address-1-1' ).value = null;
        document.getElementById( 'address-2' ).value = null;
      }
    </script>
  </body>
</html>
JavaScript / 대화상자 / Alert, Confirm, Prompt
자바스크립트에서 대화상자는 세가지가 있습니다. Alert, Confirm, Prompt로, 새 창을 띄운다는 점은 같으나 역할이 다릅니다. Alert Alert는 단순히 메시지를 전달하는 역할만 합니다. 반환하는 값이 없습니다. <!doctype html> <html lang="ko"> <head> <meta charset="utf-8"> <title>JavaScript | alert</title> <script> alert( 'Lorem ipsum dolor' ); ...
JavaScript / Object / Math.floor(), Math.ceil(), Math.round()
Math.floor() Math.floor()는 어떤 수보다 크지 않은 최대의 정수를 반환합니다. 문법 Math.floor( Number ) Number에는 숫자가 들어갑니다. 예제 <!doctype html> <html lang="ko"> <head> <meta charset="utf-8"> <title>JavaScript</title> <style> body { font-family: Consolas, monospace; ...
Uncategorized html5shiv - IE 8 이하에서 HTML5 태그 지원하게 해주는 라이브러리 imagesLoaded - 이미지가 로드되었음을 감지하는 라이브러리 Masonry - 벽돌 쌓기 모양으로 요소를 배열해주는 라이브러리 Respond.js - IE8 이하에서 미디어 쿼리(Media Query)를 사용하게 해주는 라이브러리 turn.js - 책장을 넘기는 듯한 플립(flip) 효과를 만들어 주는 라이브러리
JavaScript / Object / String.endsWith() / 특정 문자열로 끝나는지 확인하는 메서드
.endsWith() .endsWith()는 문자열이 특정 문자열로 끝나는지 확인한다. IE는 Edge부터 지원한다. 문법 string.endsWith( searchString, length ) searchString : 검색할 문자열로 필수 요소이다. 대소문자를 구분한다. length : 문자열 중 어디까지 검색할지 정한다. 선택 요소로, 값이 없으면 전체 문자열을 대상으로 한다. 예제 abcde가 e로 끝나는지 검사한다. e로 끝나므로 true를 반환한다. 'abcde'.endsWith( 'e' ) abc가 e로 끝나는지 검사한다. e로 끝나지 않으므로 false를 반환한다. 'abcde'.endsWith( ...
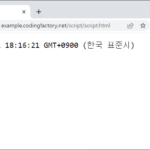
현재 날짜와 시간 가져오기 Date()로 현재 날짜와 시간을 가져온다. <!doctype html> <html lang="ko"> <head> <meta charset="utf-8"> <title>JavaScript</title> <style> body { font-family: Consolas, monospace; font-size: ...
JavaScript / Object / document.write()
.write() .write()은 문서에 문자, 코드 등을 쓰는 메서드입니다. 문법 document.write( exp1, exp2, ... ) 예제 Hello와 World를 연달아 출력합니다. document.write( 'Hello', 'World' ); 2를 출력합니다. document.write( 1+1 ) 코드는 코드로 인식합니다. document.write( '<p style="font-size: 80px; text-align: center;">Hello</p>' ); 닫는 script 태그에는 \를 붙여서 <\/script>로 씁니다. document.write( '<script>document.write( "Hello" )<\/script>' ); JavaScript / Object / document.writeln()
JavaScript / Object / Location / URL 정보 가져오는 객체
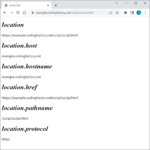
location location은 URL 정보를 가져오는 객체입니다. URL 전체 또는 일부의 정보를 가져올 수 있는데, 대표적인 것들은 다음과 같습니다. location location.host location.hostname location.href location.pathname location.protocol 예제 URL이 https://example.codingfactory.net/script/script.html 일 때, 각 객체 속성이 어떤 값을 가져오는지 알아보는 예제입니다. <!doctype html> <html lang="ko"> <head> <meta charset="utf-8"> <title>JavaScript</title> <style> h1 { ...
객체 생성 방법 1 var jb = { 'a':100, 'b':200, 'c':300 }; 객체 생성 방법 2 var jb = {}; jb = 100; jb = 200; jb = 300; 객체 생성 방법 3 var jb = new Object(); jb = 100; jb = 200; jb = 300; 객체 생성 방법 4 var jb = new Object(); jb.a = 100; jb.b = 200; jb.c = 300;

JavaScript / Plugin / Swiper / 슬라이더 플러그인
Swiper는 널리 사용되는 슬라이더 플러그인 중의 하나입니다. 다양한 옵션을 제공하며, 해상도에 따라 다른 옵션을 줄 수 있어 반응형 사이트에 사용하기 좋습니다. 홈페이지 : https://swiperjs.com/ GitHub : https://github.com/nolimits4web/swiper Swiper는 IE를 지원하지 않습니다. 만약 IE 지원이 중요하다면, IE를 지원하는 Swiper 구 버전을 사용하거나 다른 슬라이더를 사용하세요. 기본 사용법 스크립트 파일과 CSS 파일을 연결합니다. 다음은 CDN을 이용하여 연결하는 코드입니다. <script src="https://unpkg.com/swiper@7/swiper-bundle.min.js"></script> <link ...
JavaScript / Object / String.substring() / 문자열 추출하는 메서드
.substring() .substring()은 문자열에서 특정 부분만 골라낼 때 사용하는 메서드입니다. 문법 string.substring( start, end ) start와 end로 문자열에서 골라낼 부분의 처음과 끝을 지정합니다. 예를 들어 var str = '123456789'; document.write( str.substring( 1, 4 ) ); 는 234를 출력합니다. start 값은 필수이며, end 값이 지정되지 않으면 문자열의 끝까지를 의미합니다. 예제 1 <!doctype html> <html lang="ko"> <head> <meta charset="utf-8"> ...