
CSS Tutorial / CSS z-index and Stacking Contexts
z-index controls stacking within the relevant stacking context rather than assigning every element a global depth. A child with a large z-index can remain behind an element in a higher ancestor context, and z-index cannot undo overflow clipping.
Separate positioning from stacking order
To compare overlap order, the two elements must actually occupy the same screen area. If they are completely off to the left and right, or up and down, changing the z-index won't make a difference. First, check the rectangular position of the element in developer tools and determine whether any overlapping areas exist. For the positioning standards of overlapping elements, check the space and coordinate standards of CSS position: relative, absolute, fixed, and sticky.
The position determines the coordinate standard and flow participation, and the z-index determines the front and back when overlapping. Changing the coordinates with top and changing the order with z-index are different tasks. The example below fixes the positions of the badge and card and then changes only the z-index of the parent, so you can compare the two functions without mixing them up.
z-index can be applied to positioned elements such as relative·absolute, and can be used for Flex items and Grid items even if position: static. If you only assign numbers to ordinary general flow blocks and expect effects, the application conditions may not be met. You can check the meaning of the target and value in MDN's z-index description.
Compare stacking contexts as groups
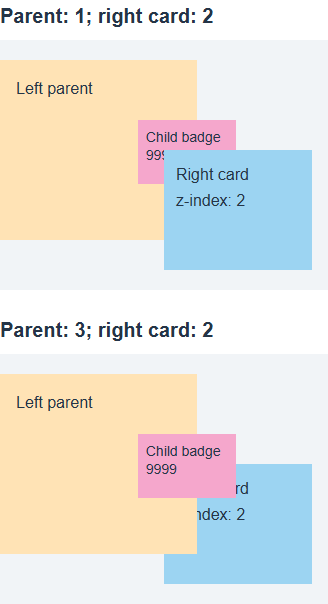
A stacking context groups its descendants for external stacking comparisons. If the left parent has z-index: 1 and the right card has z-index: 2, a child badge with z-index: 9999 inside the left context does not compete directly with the right card. The parent group remains below it.
Left parent context: z-index 1
└ Child badge: z-index 9999
Right card context: z-index 2

Outside, compare parent 1 and card 2.
Raising the left parent to z-index: 3 puts its entire context above the right card at 2. The child badge keeps its own 9999 value but becomes visible in the overlap. Ancestor and descendant numbers are not added together to produce a global value such as 10000. See MDN: Stacking context.
Identify declarations that create contexts
| Representative conditions | Create a new context | What to check |
|---|---|---|
| relative or absolute + z-index is not auto | generation | 0 is also a number and is different from auto. |
| fixed or sticky | generation | Creates context even if z-index is auto |
| Flex or Grid item + non-auto z-index | generation | Possible without position |
| opacity is less than 1 | generation | Affects group relationships as well as visibility |
| transform is not none | generation | Even if the movement amount is 0, it is different from none |
| isolation: isolate | generation | How to intentionally create a separate context |
The table above is a list of frequently encountered conditions and is not a list of all creation conditions. You must distinguish between cases where only relative is specified and z-index is auto, and cases where z-index: 0 is specified for relative. If the overlap has changed, check not only the number but also the opacity or transform newly added to the ancestor.
Within the same context, you can compare the front and back using the z-index number of the element that meets the application conditions. However, because the overall CSS draw order has multiple levels, including negative levels, normal flow, and positioned elements, do not treat auto for all elements as equal to the number 0 or calculate the overall page order based on numbers alone. Learning practice restricts conditions to positive numbers and explicit parent context.
Compare parent and child z-index values
Save the code below as stacking-context.html and open it. The badge is placed 80-144px from the top, and the card on the right is placed in the 110-230px area, with a vertical overlap of 34px. The left and right positions use a ratio to the parent width to maintain overlap on mobile. Parents and items are calculated as border-box and configured to prevent unnecessary overflow outside the container.
<!doctype html>
<html lang="en">
<head>
  <meta charset="utf-8">
  <meta name="viewport" content="width=device-width, initial-scale=1">
  <title>stacking-context.html</title>
  <style>
* { box-sizing: border-box; }
body { margin: 16px; font: 16px/1.6 sans-serif; color: #243447; }
h1 { font-size: 24px; } h2 { font-size: 20px; margin-top: 32px; }
a { color: #145f8f; } a:focus-visible { outline: 3px solid #b4470b; outline-offset: 3px; }
.scene { position: relative; width: min(100%, 520px); height: 300px; background: #f1f4f7; }
 .left { position: absolute; z-index: 1; left: 0; top: 20px; width: 60%; height: 180px;
 padding: 16px; background: #ffe3b5; }
 .badge { position: absolute; z-index: 9999; left: 70%; top: 60px; width: 50%; height: 64px;
 padding: 8px; background: #f5a7cc; }
 .right { position: absolute; z-index: 2; left: 50%; top: 110px; width: 45%; height: 120px;
 padding: 12px; background: #9cd4f2; }
 .raised .left { z-index: 3; }
  </style>
</head>
<body>
<h1>Child and parent z-index values</h1><h2>Parent: 1; right card: 2</h2><div class="scene original"><div class="left">Left parent<div class="badge">Child badge<br>9999</div></div><div class="right">Right card<br>z-index: 2</div></div><h2>Parent: 3; right card: 2</h2><div class="scene raised"><div class="left">Left parent<div class="badge">Child badge<br>9999</div></div><div class="right">Right card<br>z-index: 2</div></div>
</body>
</html>
In the first section, the overlapping pink badge is hidden by the blue card, and in the second section, the pink badge is visible on top of the blue card. The only difference between the two zones is 1 and 3 of the left parent. The screen below compares two states of the same example.
- Increase only the .badge number in the first section to 99999. The relationship between Parent 1 and Card 2 is maintained, so the overlapping part continues to be covered by the card. Restores the number to 9999.
- .original .left { z-index: 3; Add }. The badge will go up on the card without changing the coordinates. After confirmation, remove the added rule.
- In the original first section, only change the z-index of .left to auto. In this example, with no other creation properties, the left parent does not create a separate context, so the badge's context is compared to the outer card. Make sure the badge is visible in front and restore it to 1.
- Narrow or widen the screen to make sure the badge and card still overlap. Since numerical changes are not visible when the coordinates are separated, comparisons must be made while maintaining the overlap area.
Distinguish overflow clipping from stacking
If the ancestor truncates the content with overflow: hidden, the parts outside its bounds cannot be made visible again with just a high z-index. If it is forward in order but not visible, you need to determine whether it is covered by another element or cut off at an ancestor boundary. Save the code below as stacking-clip.html and run it. Even if you increase the z-index, if it is cut off at the parent boundary, check the cut conditions for CSS Overflow, Long Text Wrapping, and Ellipsis.
<!doctype html>
<html lang="en">
<head>
  <meta charset="utf-8">
  <meta name="viewport" content="width=device-width, initial-scale=1">
  <title>stacking-clip.html</title>
  <style>
* { box-sizing: border-box; }
body { margin: 16px; font: 16px/1.6 sans-serif; color: #243447; }
h1 { font-size: 24px; } h2 { font-size: 20px; margin-top: 32px; }
a { color: #145f8f; } a:focus-visible { outline: 3px solid #b4470b; outline-offset: 3px; }
.frame { position: relative; width: min(100%, 260px); height: 100px; overflow: hidden;
 border: 2px solid #789; background: #e8f5de; }
 .popup { position: absolute; z-index: 9999; left: 80%; top: 24px; width: 90px; height: 60px;
 padding: 8px; background: #f5a7cc; }
  </style>
</head>
<body>
<h1>A box that stays clipped at a higher z-index</h1><div class="frame">Parent boundary<div class="popup">Badge<br>9999</div></div><p>The right side of the badge extends beyond its parent's boundary.</p>
</body>
</html>
- Make sure the right side of the badge is cut off at the parent border. Even if you change the z-index to 99999, the truncated part does not appear. Restores the number to 9999.
- Changes only the overflow of the .frame to visible. Other coordinates and numbers remain the same, but the area outside the boundary is visible. After comparison, return it to hidden.
On real screens, removing overflow may affect other purposes, such as scrolling and rounded corners. First determine if truncation is intended, and if the popup should be outside the bounds, move the structure out of the truncation ancestor or consider a separate display method as appropriate. Don't change the overflow of all parents at once just because it hides the menu.
Follow a diagnostic sequence
- Checks whether the element actually exists and is not hidden due to display·visibility·opacity.
- Check the rectangular positions of the two elements to see if there is an actual overlapping area.
- It goes up the target element and its ancestors to find declarations that create a stacking context. Determine which common parent the competing contexts are compared to.
- The number to be replaced determines whether it is a child or parent context. Also check the affected sibling elements and adjust the values only within the necessary range.
- If you don't see it even after changing the order, check truncation such as overflow·clip and other coordinate standards. After completing the comparison, the temporarily modified values are restored to their original values.
The z-index of a regular element should not be thought of as a means of overcoming a separate display layer, such as a dialog on the top layer, by simply increasing the number. When troubleshooting default cards and badges, it's important to first understand the actual parent context and truncation. Rather than just keep increasing the numbers, you can configure the intended order even with small values by checking which groups are compared.

CSS Tutorial / CSS Background Colors and Images: cover and contain
Create and load a local background image, compare repetition, cover, contain, and position, and diagnose image-path and cropping problems.

CSS Tutorial / Apply CSS with Inline, Internal, and External Styles
Compare three ways to apply CSS, create a working external stylesheet, and diagnose common file-path and loading problems.

CSS Tutorial / CSS position: relative, absolute, fixed, and sticky
Compare positioning modes in a complete example, identify containing blocks, and troubleshoot sticky limits and overlapping content.

CSS Tutorial / CSS Keyframe Animations, Fill Modes, and Pausing
Build a complete animation example, compare end states and delays, pause decorative motion, and check a prefers-reduced-motion alternative.

CSS Tutorial / CSS Width, Height, min/max Limits, and box-sizing
Compare content-box and border-box sizing, percentage heights, fluid width limits, and the consequences of fixed heights for growing text.

CSS Tutorial / CSS Fonts, Font Sizes, and Line Height
Build a readable font stack, compare line-height inheritance, and use browser tools to identify the fonts actually rendering your text.

CSS Tutorial / CSS Overflow, Long Text Wrapping, and Ellipsis
Compare scrolling, clipping, long-word wrapping, and single-line ellipsis, including keyboard access and minimum-size issues in layout containers.

CSS Tutorial / The CSS Box Model: Content, Padding, Border, and Margin
Measure the four box areas, compare padding shorthand and vertical margin collapse, and inspect the resulting dimensions in DevTools.

CSS Tutorial / CSS Combinators and Pseudo-Classes
Compare descendant, child, and sibling selectors, then test hover, focus, and child-position conditions in a complete example.

CSS Tutorial / CSS Transforms and Transitions
Compare transform order and origins, add hover and keyboard transitions, and test overflow and reduced-motion behavior.