
What Is React? Key Concepts and Differences from jQuery
React is a JavaScript library for building user interfaces (UI). While jQuery focuses on selecting and changing page elements directly, React focuses on describing the interface for a given state of your data. Understanding components and state makes it easier to compare the two tools and decide when to use them.
What is React?
In React, you build parts of an interface, such as buttons, search boxes, and article cards, as components. Each component brings together its appearance and related behavior. You can combine components into a page and reuse a card by supplying a different title and author for each article.
React uses JavaScript, and HTML and CSS remain useful for understanding the structure and appearance of a web interface. Installing React does not automatically provide a login server, a database, or navigation between URLs. You still need to choose and implement the other parts of your application. This article focuses on a basic interface running in a browser; the official React Quick Start introduces its building blocks.
The core concepts of React
Components: units of appearance and behavior
A function component is a JavaScript function that returns the content to display. Names of components you define start with a capital letter, such as ProductCard, while HTML elements such as button use lowercase names. The following component defines a card once so that you can reuse its structure with different product data.
function ProductCard({ name, price }) {
  return (
    <article className="product-card">
      <h3>{name}</h3>
      <p>KRW {price}</p>
    </article>
  );
}
JSX: expressing markup inside JavaScript
JSX is a syntax extension that lets you write HTML-like markup in a JavaScript file. The <article> section above is JSX. Curly braces let you insert JavaScript expressions such as name and price. Pasting this component into an ordinary HTML file is not enough to run it.
JSX uses className instead of class and requires explicitly closed tags, such as <img />. Multiple top-level elements must be wrapped in a parent element or a Fragment. JSX is common in introductory examples and projects, although React can be used without it. See React’s rules for writing JSX for the syntax.
Props: data passed by a parent
Props, short for properties, are values a parent component passes to a child. They let the same card show different names and prices, or the same button show different labels. A prop can contain a string, number, object, or function. Here is an illustrative product priced in Korean won (KRW):
<ProductCard name="Beginner keyboard" price={35000} />
A child reads its props to build its output. Treat props as read-only: if their values need to change, update the data in the parent so that it passes new values. A parent can also pass a callback function for the child to call after a user action. Passing props to a component explains this data flow.
State: remembering values that change
State is information a component needs to remember, such as an input value, a selection, or a click count. Calling useState returns the current value and a function for updating it. useState is a Hook, a function that gives a component access to React features; call it at the top level of the component function.
const [count, setCount] = useState(0);
The initial value is 0, count is the current state, and setCount requests an update. Changing an ordinary variable alone does not tell React to update the interface. Values that drive the display need an appropriate state structure. State: a component’s memory explains how state differs from a local variable.
How does React update the interface?
In a counter, clicking a button requests a state update. React then calculates the output for that state and applies the necessary changes to the DOM. The Document Object Model (DOM) is the browser’s object representation of a document, including its elements and text.
- User action: a button click runs an event handler.
- Update request:
setCountspecifies the next value. - Render: React calls components to calculate their output.
- Commit: React applies the required changes to the DOM.
- Paint: the browser draws the result.
Rendering means calculating output by calling components. It does not mean reloading the whole page or deleting and recreating every HTML element. If the output is unchanged, a render may require no DOM changes. React’s render and commit documentation distinguishes these steps.
Calling setCount does not immediately replace the value of count inside the running event handler. It requests state for a subsequent render, and React can batch multiple updates. When the new value depends on the previous value, express that relationship with an updater function:
setCount(previousCount => previousCount + 1);
This function receives the pending state and returns the next state. It is useful when several increments are queued, because each update is calculated from the previous result. The useState reference explains updater functions and their requirements.
What is the difference between React and jQuery?
jQuery is also a JavaScript library. It provides selectors, event handling, changes to content and styles, and Ajax requests. Ajax, short for Asynchronous JavaScript and XML, is a technique for exchanging data with a server without reloading the whole page; the exchanged data need not be XML. The official jQuery introduction lists DOM manipulation and event handling among its main features.
| Comparison | jQuery | React |
|---|---|---|
| Interface structure | Write HTML, then select and manipulate the elements you need. | Combine components and describe their output using data. |
| Updates | Explicitly change text, add elements, or change classes. | React applies the rendered output based on state and props. |
| Data and display | Connect each data change to the required interface changes. | Describe the interface as a representation of state. |
| Events | Attach handlers through APIs such as .on(). |
Pass handlers through JSX props such as onClick. |
| Reuse | Use functions, plugins, and the structure chosen for the project. | Reuse components and supply different props. |
| Development setup | A simple example can load a script in an HTML file. | Typical projects using JSX and modules configure build tools. |
Consider adding a product to a cart. With jQuery, your code might insert a list item, update the quantity and total, and hide the empty-cart message. With React, you can describe these displays in terms of the cart state. Neither approach automatically handles server errors or validates all incoming data.
React is not always faster, and jQuery code is not always harder to maintain. Results depend on the interface, implementation, code loaded, and user actions. A single small interaction and an interface that synchronizes many states create different maintenance needs, so evaluate them in their own context.
Build the same counter with jQuery and React
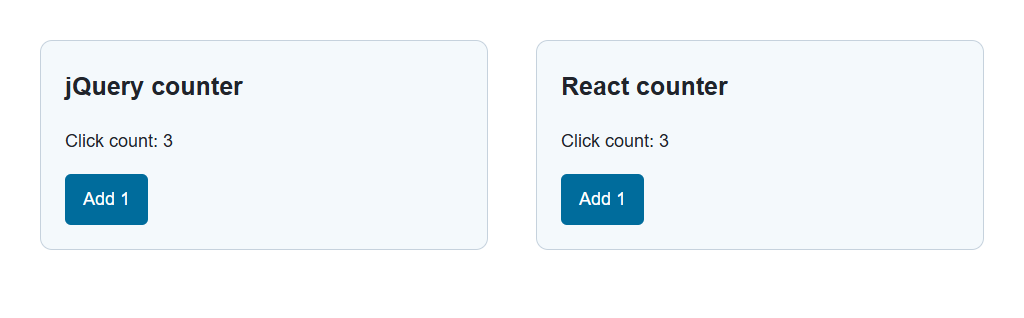
Both examples start at 0 and increase the count by 1 each time the button is activated. Their headings identify the library; their functionality and layout are otherwise equivalent. Compare where each implementation updates the displayed number. The examples below were checked with React 19.3.0, jQuery 4.0.0, Vite 8.3.4, Node.js 24.19.0, and Microsoft Edge 154, including mouse clicks, keyboard activation, and page reloads.
jQuery example: change the text of a selected element
Save the complete code below as jquery-counter.html using UTF-8 encoding, then open it in a browser. It loads jQuery 4.0.0 from the official Content Delivery Network (CDN), so you need an internet connection. Check the official jQuery releases for the available versions and files.
<!doctype html>
<html lang="en">
<head>
  <meta charset="utf-8">
  <meta name="viewport" content="width=device-width, initial-scale=1">
  <title>jQuery counter</title>
  <style>
body {
  margin: 0;
  color: #20242b;
  background: #fff;
  font: 18px/1.7 Arial, sans-serif;
}
.counter {
  box-sizing: border-box;
  max-width: 460px;
  margin: 24px auto;
  padding: 24px;
  border: 1px solid #c6d2dd;
  border-radius: 12px;
  background: #f4f9fc;
}
h1 { font-size: 25px; margin: 0 0 12px; }
button {
  padding: 10px 18px;
  border: 0;
  border-radius: 6px;
  background: #006c9c;
  color: white;
  font: inherit;
  cursor: pointer;
}
button:focus-visible { outline: 3px solid #a03c00; outline-offset: 3px; }
@media (max-width: 510px) { .counter { margin: 16px; } }
  </style>
</head>
<body>
  <main class="counter">
    <h1>jQuery counter</h1>
    <p>Click count: <span id="count" aria-live="polite">0</span></p>
    <button type="button" id="increase">Add 1</button>
  </main>
  <script src="https://code.jquery.com/jquery-4.0.0.min.js"></script>
  <script>
    let count = 0;

    $('#increase').on('click', function () {
      count += 1;
      $('#count').text(count);
    });
  </script>
</body>
</html>
$("#increase") selects the button, and .on("click", ...) attaches the handler. After changing the variable, the code calls $("#count").text(count) to update the displayed text. See the jQuery .on() reference and jQuery .text() reference for those operations.
The scripts appear after the button, so the target elements already exist when this example runs. If nothing changes, check the CDN request and console errors in browser developer tools, and compare the element IDs with the selectors. When adapting this to a WordPress theme, avoid loading the library twice and check whether $ refers to jQuery under its noConflict configuration.
React example: update state to change the interface
This learning example uses Vite’s JavaScript React template. Vite provides a development server and transforms and builds source files. Node.js runs these tools on your computer, and npm installs packages and runs project commands. Install a supported long-term support (LTS) version of Node.js that meets the Vite getting-started requirements. In October 2026, the guide lists Node.js 20.19+ or 22.12+; also check any additional requirements of the generated template.
- Open a terminal in the folder where you want to create the project. Make sure a folder with the same name does not already exist.
- Run the commands below to create the JavaScript
reacttemplate and install its packages.
npm create vite@latest react-counter -- --template react --no-interactive
cd react-counter
npm install
On the first run, npm may ask you to confirm installation of the scaffolding tool. After installation, replace the contents of src/App.jsx with the following code. label is a prop supplied by the parent, and count is state remembered by the component.
import { useState } from 'react';

function Counter({ label }) {
  const [count, setCount] = useState(0);

  function handleClick() {
    setCount(previousCount => previousCount + 1);
  }

  return (
    <main className="counter">
      <h1>{label}</h1>
      <p>Click count: <span aria-live="polite">{count}</span></p>
      <button type="button" onClick={handleClick}>Add 1</button>
    </main>
  );
}

export default function App() {
  return <Counter label="React counter" />;
}
Use the following entry code in src/main.jsx. createRoot connects the React interface to the HTML element with the ID root, and index.css supplies the styles.
import { StrictMode } from 'react';
import { createRoot } from 'react-dom/client';
import App from './App.jsx';
import './index.css';

createRoot(document.getElementById('root')).render(
  <StrictMode>
    <App />
  </StrictMode>
);
Replace src/index.css with the CSS below to match the jQuery example. The replacement App.jsx does not import App.css, so the template’s default component styles do not interfere with this layout.
body {
  margin: 0;
  color: #20242b;
  background: #fff;
  font: 18px/1.7 Arial, sans-serif;
}
.counter {
  box-sizing: border-box;
  max-width: 460px;
  margin: 24px auto;
  padding: 24px;
  border: 1px solid #c6d2dd;
  border-radius: 12px;
  background: #f4f9fc;
}
h1 { font-size: 25px; margin: 0 0 12px; }
button {
  padding: 10px 18px;
  border: 0;
  border-radius: 6px;
  background: #006c9c;
  color: white;
  font: inherit;
  cursor: pointer;
}
button:focus-visible { outline: 3px solid #a03c00; outline-offset: 3px; }
@media (max-width: 510px) { .counter { margin: 16px; } }
The project’s index.html must contain <div id="root"></div> and the module script that loads src/main.jsx. Keep this structure from the Vite template and use lang="en" for the English document. Start the development server:
npm run dev
Open the Local address printed in the terminal. It is usually http://localhost:5173, but a different port may be used if that port is occupied. Stop the server with Ctrl+C in the terminal. If changes do not appear, check that you saved the file and are working in the correct project. JSX errors appear in the terminal or the browser’s error display.
The React handler does not select the number element and replace its text. The JSX expression {count} connects the output to state, and setCount requests a new state. In both examples, reloading the page resets the count to 0 because no storage is implemented. These examples illustrate the update patterns; they are not a performance benchmark.
When should you choose React or jQuery?
Adding a small feature to an existing page
A button that toggles an element or a small menu may be straightforward with jQuery. If the existing page already depends on jQuery, keeping that structure can reduce the scope of the change. Also consider whether standard DOM APIs are sufficient. A new dependency is not necessary for every small interaction.
Building an interface with connected states
React’s component and state model is worth considering when the same data affects a product list, filters, and cart totals, or when similar interfaces appear repeatedly. You still need to decide which component owns each state and when server data should refresh. Adopting React alone does not guarantee a good design.
Adding React to part of an existing site
You do not need to rebuild the whole site to use React. You can mount a component inside a specific element and keep the rest of the page in its existing form. The official guide to adding React to an existing project describes the setup and scope.
If React and jQuery share a page, give them clear boundaries for DOM ownership. Arbitrarily adding or deleting children managed by React can put the real DOM out of sync with React’s view of it. A plugin that manipulates the DOM needs an integration that manages its initialization and cleanup within the appropriate lifecycle. See React’s guidance on modifying the DOM it manages for these limitations.
Before adopting a tool, consider the complexity of the interface state, the components you can reuse, your team’s JavaScript experience, and the development and deployment setup. A small page with an existing jQuery dependency has different needs from a new interactive application. After learning the basics of HTML, CSS, and JavaScript, running these counters provides a concrete comparison between changing elements directly and describing an interface through state.

What Is React? Key Concepts and Differences from jQuery
Understand components, JSX, props, and state, then compare how React and jQuery update a page. Run equivalent counter examples and learn which approach fits your project.